If you’re looking for a way to take full advantage of the new WordPress 3.0 custom menu and background features, then keep reading. Learn how to integrate the WordPress 3.0 custom menu and make it backwards compatible for older WordPress versions. Also learn how to implement the new “header background image”; all with detailed examples, codes, and pictures.
Add WordPress 3.0 Menu Navigation (and make it backwards compatible!)
I’ve read a couple different tutorials on how to implement the new menu navigation, but none of them have been detailed or shown how to write backwards compatible code. So let’s do this right. Let’s start with the code, this should be pasted inside the “functions.php” file inside of open PHP code.
if (function_exists('wp_nav_menu')) {
add_action( 'init', 'register_my_menus' );
function register_my_menus() {
register_nav_menus(
array(
'Your-Menu' => __( 'Your Menu' ),
)
);
}
} |
First, we have WordPress check to see if the function “wp_nav_menu” exists. We do this essentially to check if they’re using a WordPress version that supports the custom menu function, 3.0+. If the function does exist, the rest of the code registers your new menus. This makes your code backwards compatible for people still using older versions of WordPress. Although there are more steps you have to take to make your theme completely backwards compatible, but I’ll cover those steps in a second.
Next, if you look at the line that says ‘Your-Menu’ => __( ‘Your Menu’ ), this is where you will assign the name for your menu. You can also register multiple menus for different areas in your WordPress theme. For instance, if you have a “page menu” and a “category menu”, you would want to register two separate menus. This is done by simply duplicating the “Your-Menu” line, here’s an example:
if (function_exists('wp_nav_menu')) {
add_action( 'init', 'register_my_menus' );
function register_my_menus() {
register_nav_menus(
array(
'page-menu' => __( 'Page Menu' ),
'category-menu' => __( 'Category Menu' ),
)
);
} |
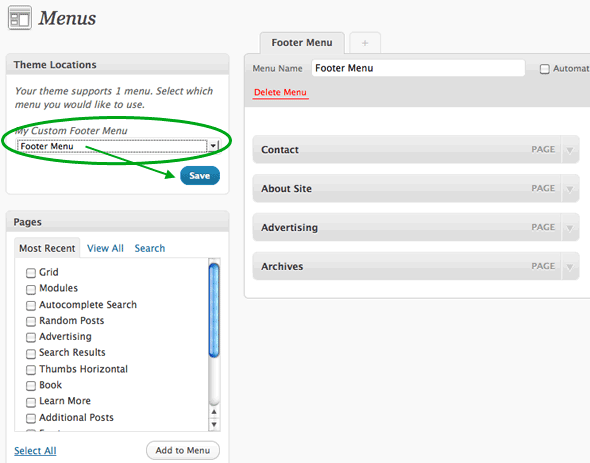
As you can see from this example, we’ve registered two different menus. Now, when a user logs into their wp-admin page and clicks on “appearance / menus” they’ll see this box, where they can create and add menus to each registered and named menu location.


How To Integrate Custom Navigation Menus Inside Your WordPress Theme
In the following example, the code will first check if the user is using WordPress 3.0, if so it will use the “Page-Menu” 3.0 menu that we’ve registered previously in the functions.php. If not, it will default to the standard “wp_list_pages” syntax. You can also use this for a category bar by replacing “wp_list_pages” with “wp_list_categories”. Place this bit of code inside your theme wherever you want your specific menu(s) to appear:
if(function_exists('wp_nav_menu')){
wp_nav_menu( array( 'theme_location' => 'Page-Menu', 'container_class' => 'menuclass') );}
else{
wp_list_pages('title_li=&depth=0');
} |
If you look at the area of code that says ‘container_class’ => ‘menuclass’, this is where you can set the CSS class ( “menuclass” in this case ) for the menu.
Using this code will ensure that you’ll have custom menus for WP 3.0 + users, and default to older WordPress standards if they’re using a sub 3.0 version. This is essential for anyone planning to release a theme to the public.
The post WordPress 3.0 menu function appeared first on ReadyEdge Technologies Pvt Ltd.


